Warehouse Management

Updated on October 18th, 2023

  • Extensiv Hub
    Popular Articles Getting Started Using Hub Technical Issues & FAQs Extensiv's Ideas Portal
  • 3PL Warehouse Manager
    Receiving Operations Inventory Management Shipping Operations System Configuration Scanning Operations Integrations Content Best Practice Resources Release Notes Popular Articles Troubleshooting Guides
  • Warehouse Management
    Getting Started Admin Console Shipping Order Picking & Packing Receiving Customer Portal Cycle Counting Kit Building Managing Users Barcode Scanner Import/Export Integrations Barcoding Wave Picking Bin Move Mobile Receiving and Picking Settings Popular Articles Reporting
  • Order Management
    Dashboard Orders Inventory Purchase Orders Shipments Customers Products Analytics Settings API API Integrations Accessing and Navigating Order Manager Error Messages Order Manager Popular Articles Accounting Integrations
  • Integration Management
    Getting Started with Integration Manager General Support Troubleshooting Extras & Addons API Documentation Popular Articles Order Sources Order Destinations
  • FAQs
  • Network Manager
    Getting Started Order Routing Management Technical Issues Shopping Carts Settings Settings, Products, and Orders
  • Billing Manager
    Getting Started Using Billing Manager
  • Release Notes
    Extensiv Sandbox Extensiv Extensiv Hub 3PL Warehouse Manager Integration Management Warehouse Management Order Management Billing Manager
  • Fulfillment Marketplace
    Getting Started
  • Sandbox
    Getting Started
+ More
  • Help Center
  • Warehouse Management
  • Receiving
  • Receiving on Device/Mobile
  • Receiving
    • Overview
        • Receiving Overview
        • Receiving Modes
    • Receiving on Device/Mobile
        • Creating a Purchase Order
        • Single Bin Receiving - Device
        • Single Bin Receiving - Mobile
        • Direct Put Away Receiving
        • Guided Put Away
    • Editing Receiving
        • Adjusting Quantities
        • Deleting Line Items Received

Guided Put Away

e Guided Put Away is a two-step process for receiving inventory. This is when you plan to receive an inbound order to a staging area, and then proceed to put away inventory to their long-term picking location.

Warehouse and Part Set-Up

Setting up a staging bin

You need to set up a staging bin as the temporary location for the inventory. 

  1. Navigate to Warehouse > Bins > click New.
     
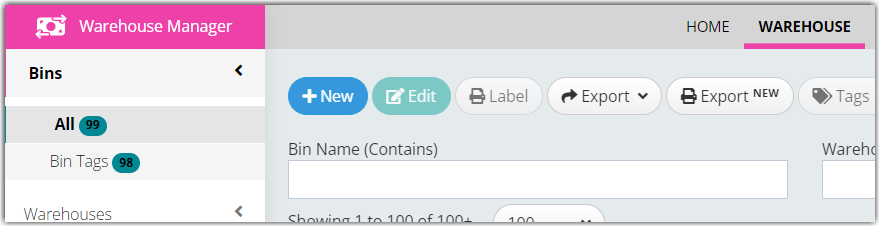
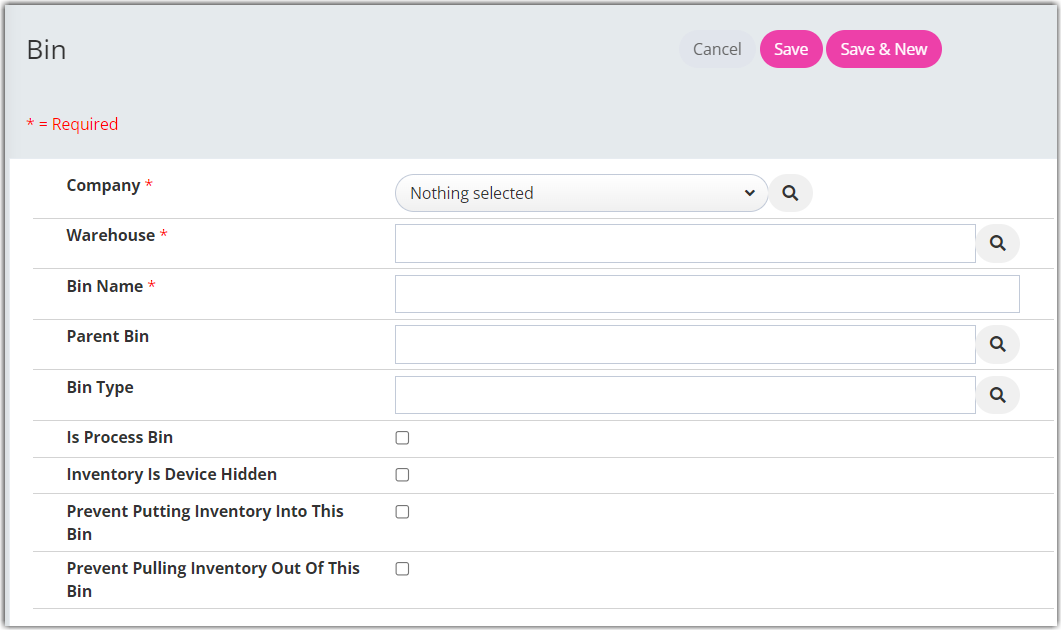
  2. Select the ‘Company’, enter the ‘Warehouse’ and ‘Bin Name’. Also, select the ‘Is Process Bin’ checkbox to denote that it is used as a staging bin.
  3. Click Save when done.
     

Setting up a Put Away bin in Part record


Once the staging bin is created, you need to assign this Put Away Bin in the Part record.

 The part needs to be saved with the ‘SKU’, ‘Part Description’, and ‘Vendor’. 


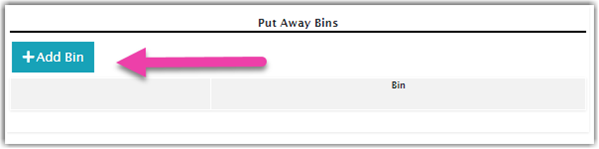
Once saved, the option to assign a Put Away Bin appears in the part record.

  1. To add the putaway bin, go to the part record and click View.


  2. On the part record, scroll down to see the Put Away Bins section and then click Add Bin.


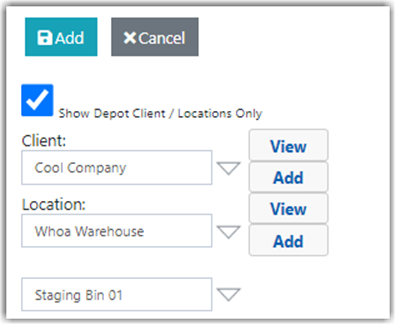
  3. Choose a Client and Location, then select the staging bin you have created. Click Add when done.


    The part is now ready to use the guided put away process.


Guided Put Away in Mobile

Step One: Receive to staging bin

Once an inbound order is ready to receive into the system, you can utilize guided put away on the mobile device to complete.

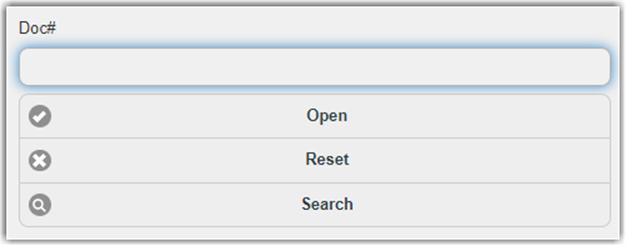
  1. Log in to the mobile device and navigate to Shipping/Receiving > Receiving.

  2. Select the order to receive by scanning or entering in the ‘Doc#’ or searching by date.
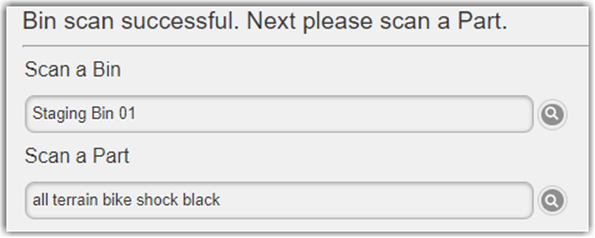
  3. Scan a Bin or select the staging bin.
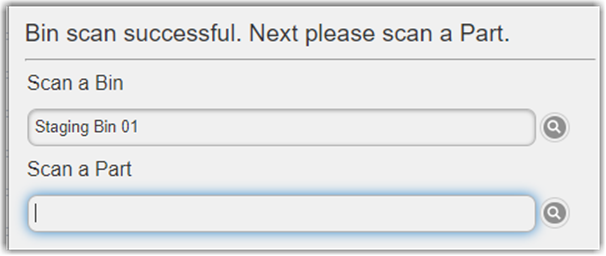
  4. Scan or enter the part to receive. You can also select from the part list.
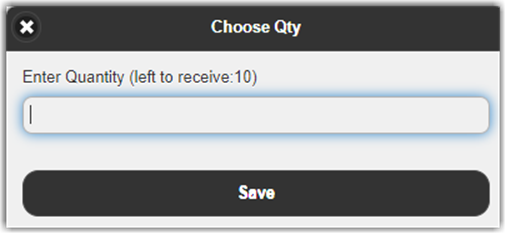
  5. Enter the ‘Quantity’  to receive. Then click Save.
  6. Click Complete when all parts have been received.

    The inbound order has been received in the system but is currently in the Staging Bin.
     

Step Two: Bin Move to Put Away Bin

The next step is to do a “Bin Move” to put the inventory in the bin it will live in until picking.

  1. In the mobile device home screen, click Bin Move.
  2. Click Inventory Move.

    If these were serialized parts, click Asset Move.


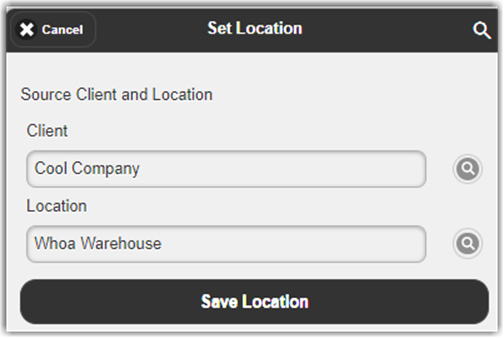
  3. Choose ‘Client’ and ‘Location’, then click Save Location.
  4. Select the part to move. (Must be done one part at a time).
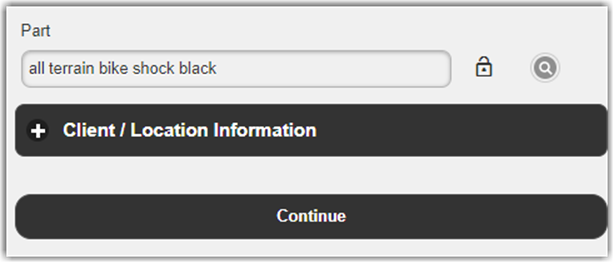
  5. Click Continue.
  6. Next, scan, enter or select the ‘From Bin’.

    Note: When the magnifying glass next to the ‘From Bin’ box is selected, all bins that have the inventory of the selected part will be listed.


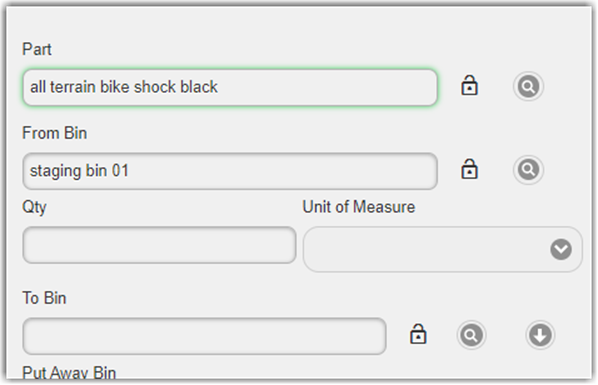
  7. Enter the quantity to move, (‘Unit of Measure’  if applicable), and ‘To Bin’.
  8. By clicking on the down arrow next to the ‘To Bin’, all bins containing inventory of this part will be listed.
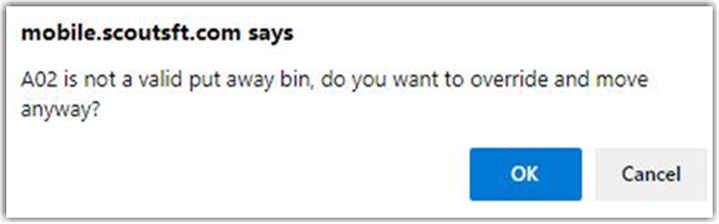
  9. The assigned Put Away Bin will be listed . (You  can choose a different bin to move to but will be prompted that that would not be the assigned put away bin)
  10. Enter a Reason Code if desired. (By default, there is none, but you can add one in Settings > Reason Codes).
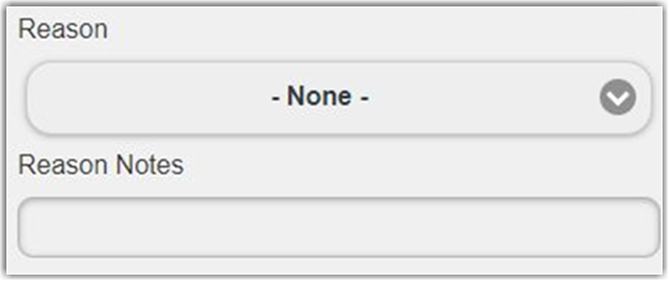
  11. Enter Reason Notes, if desired. (Not required).
  12. Click Move when done.

Sucess!

You have now reassigned the part from the staging bin to another location and are now ready for picking.  


Extensiv University

Gain deeper insights and learn more about Warehouse Manager with our online course at Extensiv University.


putaway guided

Was this article helpful?

Yes
No
Share additional feedback about this article

Related Articles

  • Direct Put Away Receiving
  • Creating a Purchase Order
  • Single Bin Receiving - Mobile
  • Single Bin Receiving - Device

Not finding the help you need?

Contact Support
Solutions
  • Solutions for Brands
  • Solutions for 3PLs
  • Solutions for 4PLs
  • Solutions for B2B
Products
  • Extensiv 3PL Warehouse Manager
  • Extensiv Warehouse Manager
  • Extensiv Order Manager
  • Extensiv Integration Manager
  • Extensiv Network Manager
Products
  • Customer Success
  • Implementation
  • Consulting
Ecosystem
  • Fulfillment Marketplace
  • Integrations
  • Partners
  • Become a Partner
Resources
  • Resource Library
  • Blog
  • Market Insights
  • What is a 3PL?
  • What is a 4PL?
  • What is a WMS?
  • Why a Cloud-based WMS?
  • Glossary
Help
  • Help Center
  • API Documentation
  • Extensiv Univerisity
  • Community
  • System Status
  • Extensiv Logo
  • 100 N Pacific Coast Hwy, Suite 1100, El Segundo, CA 90245
  • |
  • Contact Us:
  • 83-EXTENSIV 888.375.2368 (main)
  • |
  • 310.844.7570 (local)
  • Copyright © 2023 Extensiv
  • |
  • All rights reserved.
  • Privacy Policy
  • |
  • Terms of Service
  • Follow Us:
Expand