3PL Warehouse Manager

Updated on July 28th, 2023

  • Extensiv Hub
    Popular Articles Getting Started Using Hub Technical Issues & FAQs Extensiv's Ideas Portal
  • 3PL Warehouse Manager
    Receiving Operations Inventory Management Shipping Operations System Configuration Scanning Operations Integrations Content Best Practice Resources Release Notes Popular Articles Troubleshooting Guides
  • Warehouse Management
    Getting Started Admin Console Shipping Order Picking & Packing Receiving Customer Portal Cycle Counting Kit Building Managing Users Barcode Scanner Import/Export Integrations Barcoding Wave Picking Bin Move Mobile Receiving and Picking Settings Popular Articles Reporting
  • Order Management
    Dashboard Orders Inventory Purchase Orders Shipments Customers Products Analytics Settings API API Integrations Accessing and Navigating Order Manager Error Messages Order Manager Popular Articles Accounting Integrations
  • Integration Management
    Getting Started with Integration Manager General Support Troubleshooting Extras & Addons API Documentation Popular Articles Order Sources Order Destinations
  • FAQs
  • Network Manager
    Getting Started Order Routing Management Technical Issues Shopping Carts Settings Settings, Products, and Orders
  • Billing Manager
    Getting Started Using Billing Manager
  • Release Notes
    Extensiv Sandbox Extensiv Extensiv Hub 3PL Warehouse Manager Integration Management Warehouse Management Order Management Billing Manager
  • Fulfillment Marketplace
    Getting Started
  • Sandbox
    Getting Started
+ More
  • Help Center
  • 3PL Warehouse Manager
  • Integrations Content
  • QuickBooks Online
  • Integrations Content
    • API Shopping Cart Integrations
        • Getting Started with Shopping Cart Integrations
        • ShipStation Integration
        • Shopify Shopping Cart Connection
        • WooCommerce Shopping Cart Connection
        • Amazon Shopping Cart Connection
        • Magento 2.x Shopping Cart Connection
        • Volusion Shopping Cart Connection
        • eBay Shopping Cart Connection
    • EDI Processes
        • Getting Started with an EDI Integration
        • Extensiv UCC Carton Label Library
        • EDI Processing
        • Setting Up FTP Email Notifications
        • Sending Receipt Advice
        • Printing UCC Labels
        • Sending an ASN
        • Troubleshooting ASN Errors
        • Using the Customer Error Log
        • Understanding Common EDI Errors
    • DataDocks
        • Understanding DataDocks
        • Using the 3PL Warehouse Manager and DataDocks Integration
    • General Information
        • Whitelisting IP Addresses
    • QuickBooks Desktop
        • Connecting a QuickBooks Desktop Account
        • Connecting Customers to QuickBooks Desktop
        • Understanding Class Tracking
        • Understanding QuickBooks Desktop Billing Setup
    • QuickBooks Online
        • Connecting a QuickBooks Online Account
        • Connecting Customers to QuickBooks Online
        • Configuring Invoice Settings
        • Defining International Tax Codes
        • Understanding QuickBooks Online Billing Setup
    • REST API
        • Getting Started with Credential Management
        • Providing REST API Access
        • Webhooks FAQs
        • Configuring Webhooks
        • Implementing Webhooks
    • Shopify
        • Changing your fulfillment settings in the Shopify app
        • Shopify App Write Fulfillment Permissions

Configuring Invoice Settings

If your QuickBooks Online account is integrated with 3PL Warehouse Manager, you can modify the invoice number generation schema and customer notification options for your customer's invoices.

This article reviews how to configure your invoice settings for QuickBooks Online.

Please note that invoice settings are only applicable to QuickBooks Online users—this configuration is not supported with QuickBooks Desktop.

 
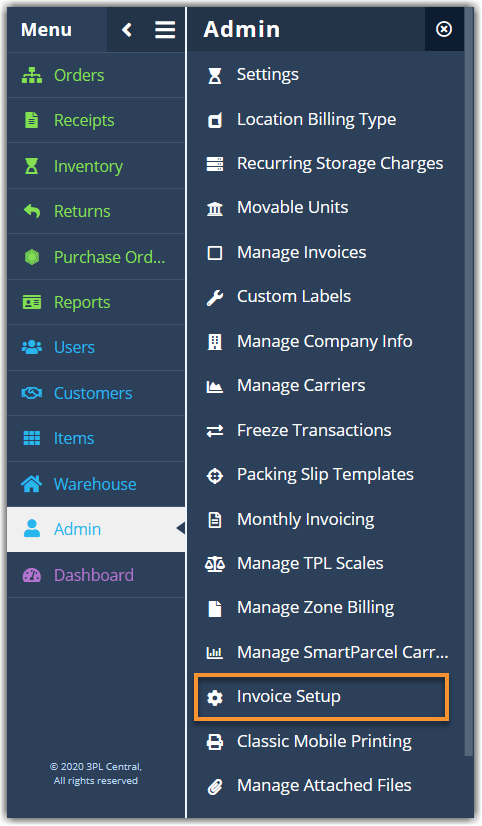
  1. Navigate to Admin > Invoice Setup in 3PL Warehouse Manager.
  2. If you want the invoice settings to be the same for all of your customers, click the Edit icon next to the Default Invoice Number Setup in the grid. If you want to create customer-specific invoice settings, click Add.
  3. Complete each field, then click Save. Note that the asterisk (*) next to the below fields indicate that these settings are unique to the customer-specific invoice settings.

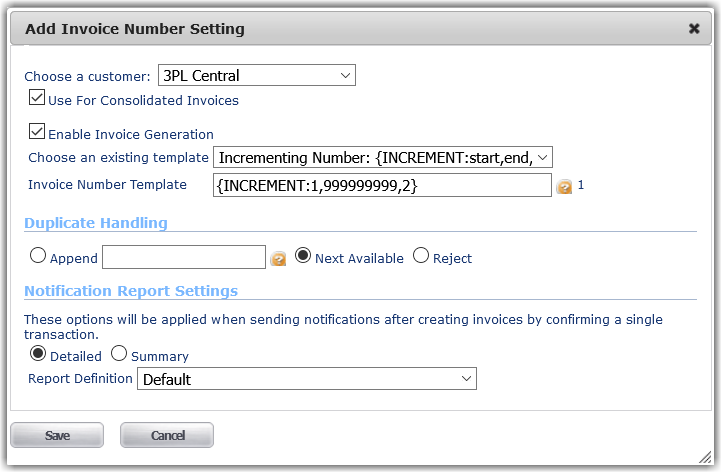
    • Choose a customer*: Allows you to select the relevant customer
    • Use For Consolidated Invoices*: Option to use this configuration when consolidating multiple transactions into one invoice
    • Enable Invoice Generation: Option to allow the generation of invoices for this customer
    • Choose an existing template: Allows you to augment the invoice number schema
      • Transaction ID: Pulls the relevant transaction number as the invoice number
      • Reference Number: Pulls the relevant reference number as the invoice number (default setting)
      • Incrementing Number: Allows you to choose a starting number, ending number, and incremental value for the schema
        • We recommend using a low number for the 'start', a very large number for the 'end', and a relatively small increment so that the schema never ends.
        • For example, {INCREMENT:1,99999999999,2} would create your very first invoice number for this customer as 1, your second invoice number as 3, and so on—until you reach invoice number 99999999999.
      • Prefix + Transaction ID: Allows you to specify a value that precedes the transaction number for the schema—e.g., if you define "3PL-{OBJID}" as the schema, the invoice number for transaction 43420 would be "3PL-43420"
      • Transaction ID + Suffix: Allows you to specify a value that succeeds the transaction number for the schema—e.g., if you define "{OBJID}-3PL" as the schema, the invoice number for transaction 43420 would be "43420-3PL"
      • Date + Transaction ID: Pulls the invoice generation date, according to the time zone defined in your warehouse setup, and relevant transaction number as the invoice number—e.g., an invoice generated on October 17, 2020 for transaction 43420 would read as "2020-10-17-43420"
      • Customer Name + Date: Pulls the customer's name and invoice generation date, according to the time zone defined in your warehouse setup as the invoice number—e.g., an invoice generated on October 17, 2020 for customer Extensiv would read as "Extensiv-2020-10-17"
    • Duplicate Handling: Allows you to control how the system handles duplicate invoice numbers to ensure that all invoices are unique
      • Append: Option to specify a value at the end of the system-generated invoice number (special characters are not supported)—e.g., if you choose to append "-copy", a duplicate invoice number of 1234 would change to "1234-copy"
      • Next Available: If using the Incrementing Number template, this option uses the next available incremental number
      • Reject: Fails the invoice delivery and leaves the duplicate invoice in the Failed queue for further review
    • Notification Report Settings: These settings apply if you don't manually generate an invoice on the Manage Invoices page and include invoices in customer notifications
      • Detailed: Includes every charge amount on the transaction
      • Summary: Includes the total charge amount for the transaction
      • Report Definition*: Allows you to select an available custom invoice template as the format of the invoice

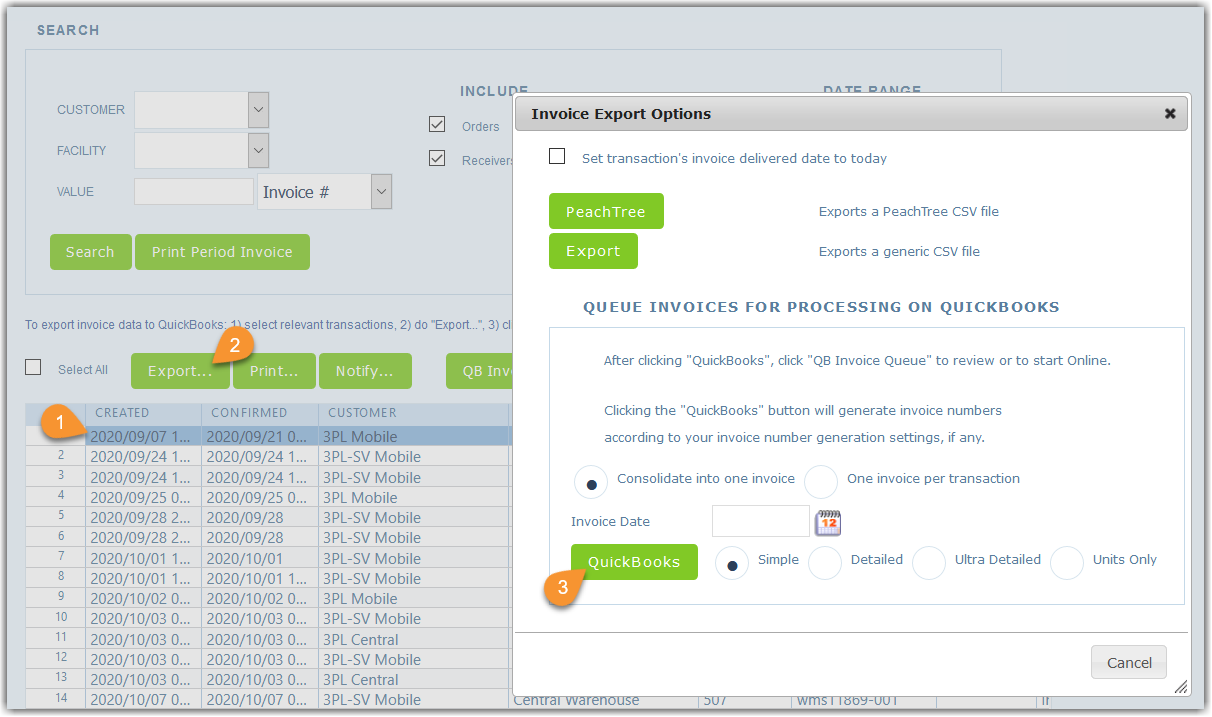
Once saved, the specified schema applies each time you manually generate an invoice via Admin > Manage Invoices. Select an invoice, click Export, make your needed selections, then click QuickBooks to generate the custom invoice number and export the invoice to the QuickBooks Invoice Queue.


configuration invoice setup

Was this article helpful?

Yes
No
Share additional feedback about this article

Related Articles

  • Item-Based Handling Fees
  • June 24, 2020 – 1.323 Major Release Notes
  • Managing Suppliers
  • Packing from Shelves

Not finding the help you need?

Contact Support
Solutions
  • Solutions for Brands
  • Solutions for 3PLs
  • Solutions for 4PLs
  • Solutions for B2B
Products
  • Extensiv 3PL Warehouse Manager
  • Extensiv Warehouse Manager
  • Extensiv Order Manager
  • Extensiv Integration Manager
  • Extensiv Network Manager
Products
  • Customer Success
  • Implementation
  • Consulting
Ecosystem
  • Fulfillment Marketplace
  • Integrations
  • Partners
  • Become a Partner
Resources
  • Resource Library
  • Blog
  • Market Insights
  • What is a 3PL?
  • What is a 4PL?
  • What is a WMS?
  • Why a Cloud-based WMS?
  • Glossary
Help
  • Help Center
  • API Documentation
  • Extensiv Univerisity
  • Community
  • System Status
  • Extensiv Logo
  • 100 N Pacific Coast Hwy, Suite 1100, El Segundo, CA 90245
  • |
  • Contact Us:
  • 83-EXTENSIV 888.375.2368 (main)
  • |
  • 310.844.7570 (local)
  • Copyright © 2023 Extensiv
  • |
  • All rights reserved.
  • Privacy Policy
  • |
  • Terms of Service
  • Follow Us:
Expand