Warehouse Management

Updated on October 20th, 2023

  • Extensiv Hub
    Popular Articles Getting Started Using Hub Technical Issues & FAQs Extensiv's Ideas Portal
  • 3PL Warehouse Manager
    Receiving Operations Inventory Management Shipping Operations System Configuration Scanning Operations Integrations Content Best Practice Resources Release Notes Popular Articles Troubleshooting Guides
  • Warehouse Management
    Getting Started Admin Console Shipping Order Picking & Packing Receiving Customer Portal Cycle Counting Kit Building Managing Users Barcode Scanner Import/Export Integrations Barcoding Wave Picking Bin Move Mobile Receiving and Picking Settings Popular Articles Reporting
  • Order Management
    Dashboard Orders Inventory Purchase Orders Shipments Customers Products Analytics Settings API API Integrations Accessing and Navigating Order Manager Error Messages Order Manager Popular Articles Accounting Integrations
  • Integration Management
    Getting Started with Integration Manager General Support Troubleshooting Extras & Addons API Documentation Popular Articles Order Sources Order Destinations
  • FAQs
  • Network Manager
    Getting Started Order Routing Management Technical Issues Shopping Carts Settings Settings, Products, and Orders
  • Billing Manager
    Getting Started Using Billing Manager
  • Release Notes
    Extensiv Sandbox Extensiv Extensiv Hub 3PL Warehouse Manager Integration Management Warehouse Management Order Management Billing Manager
  • Fulfillment Marketplace
    Getting Started
  • Sandbox
    Getting Started
+ More
  • Help Center
  • Warehouse Management
  • Wave Picking
  • Creating Waves
  • Wave Picking
    • Wave Pick Information
        • What is Wave Picking
        • Wave Pick Modes
        • Navigating Wave Picking
    • Creating Waves
        • Create Waves Section
        • Creating a Single Wave
        • Creating an Advanced wave
    • Other Wave Pick Functions
        • Pick Carts and Pick Totes
        • Wave Picking on Mobile
        • Wave Automation
        • WavePickScanTote Setting

Creating an Advanced wave

This will allow you to configure more specific options when creating views, like specifying pickers, choosing how the picking work will be split up and whether you are organizing inventory on the cart, and giving the wave template a name.

To Create an Advanced Wave:
 

Navigate to Orders > Wave Picking > Create Waves and select a view where you want to create a wave. Notice that all orders that meet the criteria of the view are listed below:


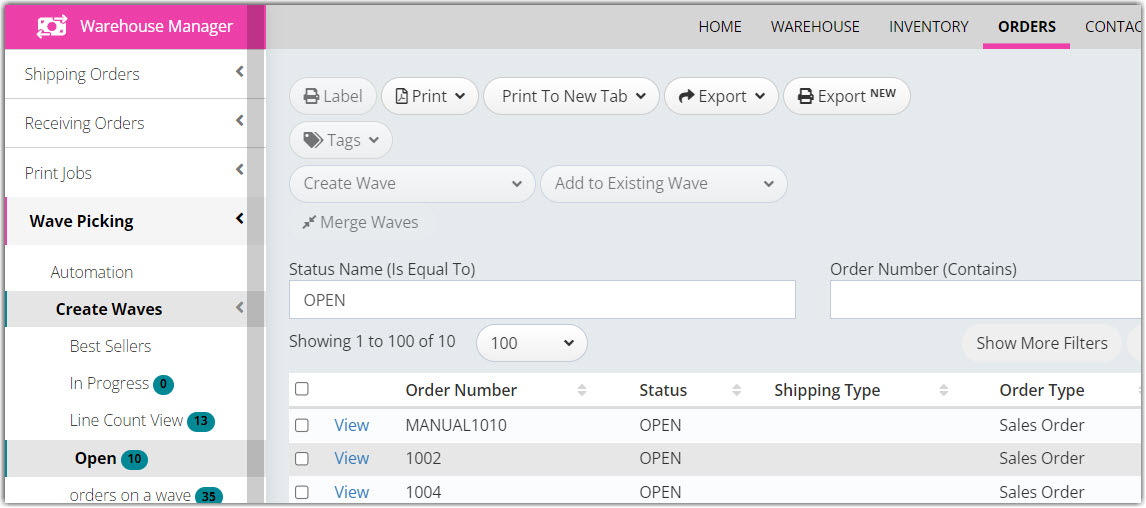
Select the order(s) that you want to put on a wave.

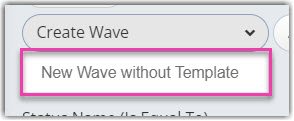
Click Create Wave then select New Wave without Template. 
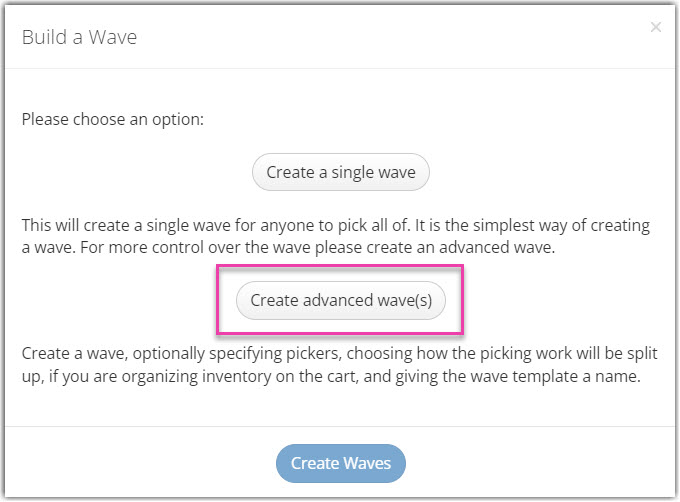
The Build a Wave wizard will pop up then select Create advanced wave(s).


Build a Wave Steps


The Build a Wave wizard has 4 different sections for setup. Go through each page with the customer and fill it out accordingly.

Pickers (Step 1 of 4):
 

Assign a wave a name, you can leave it blank for the system to assign a unique wave number.

Enter the number of pickers you want to work on this wave.

  • If you have selected only 1 picker, the next step is skipped and proceeds to Configurations (Step 3 of 4).
  • Set the number of pickers to 2+ to proceed with Splitting Work (Step 2 of 4).


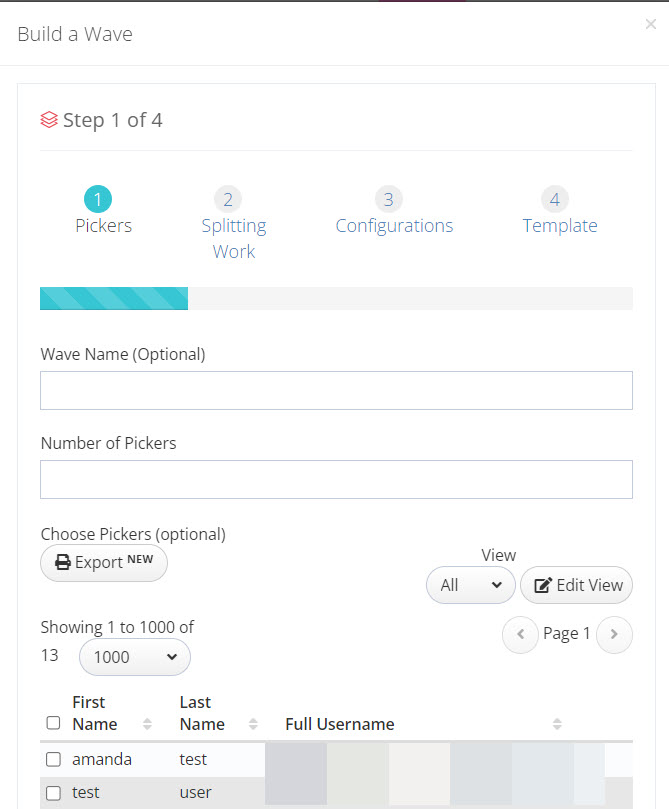
Click (2) Splitting Work or Next to proceed to the next step.

Splitting Work (Step 2 of 4): 
 

If you have selected 2 or more pickers, you can choose between:

  • Split orders across pickers and choose Split evenly by order as a method of splitting.
  • Using zones to split up the warehouse. 

It is recommended to select splitting orders across pickers as splitting using zones requires to be set up in the warehouse.
Assign Pickers if desired (not required). If this function is used, the user will be able to access this wave in My Tasks when they log in on a mobile device.


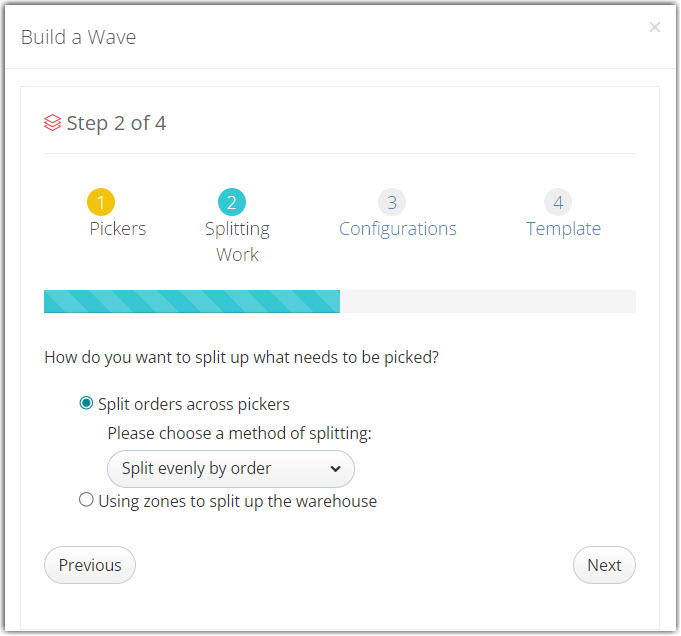
Click (3) Configurations or Next to proceed to the next step.

Configurations (Step 3 of 4): 
 

If you are using a pick cart with totes, click the checkbox and select 1 order per tote from the drop-down list.

If the number of orders on a wave is more than the number of totes that can fit on a cart, a second cart will be needed to finish the wave.
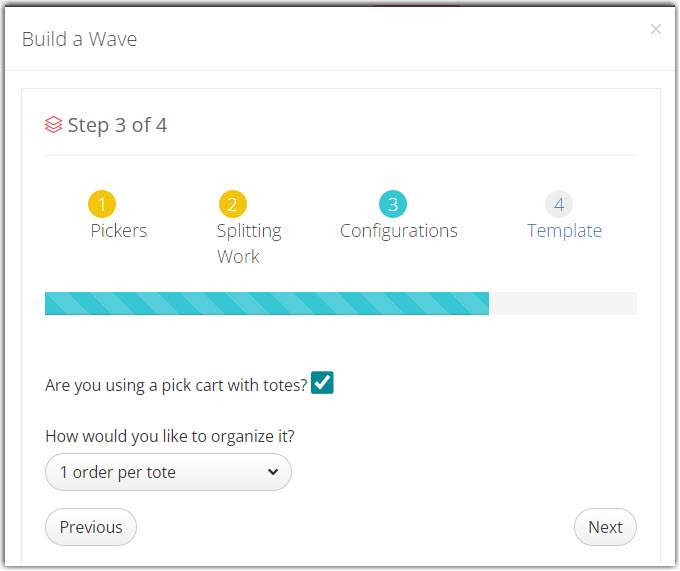


Click (4) Template or Next to proceed to the next step.

Template (Step 4 of 4):
 

If you want to save your selections to use as a template for future advance wave picks, enter a Template Name. If not, you can leave this field blank. If you are saving the template, you can also include the picker information in the template.
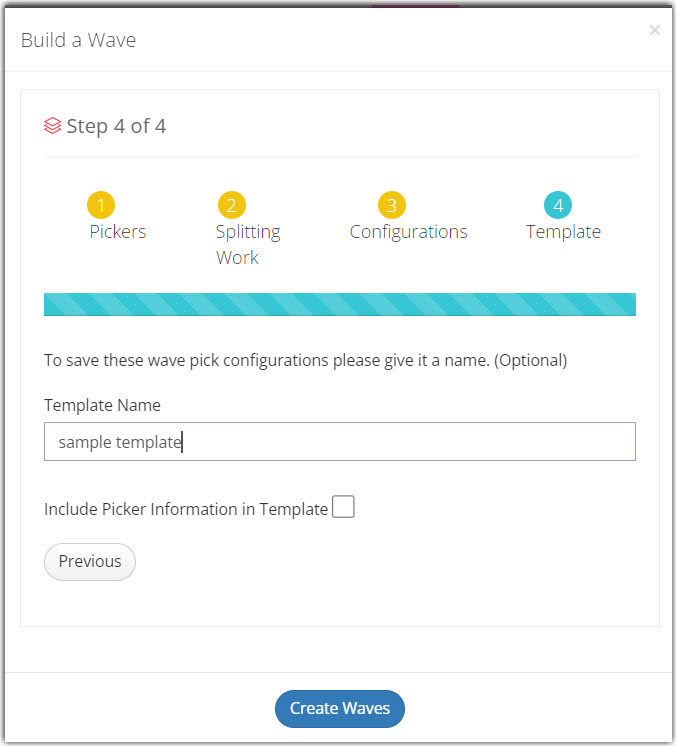


Click Create Wave. The wave is created and ready to be picked in the mobile device.
Now that we have waves created, we are almost ready to pick the wave. But first, we need to be able to pick onto a cart! For more information, see our help center article on Pick Carts and Totes.

wave creation advanced wave

Was this article helpful?

Yes
No
Share additional feedback about this article

Related Articles

  • Creating a Single Wave
  • Create Waves Section

Not finding the help you need?

Contact Support
Solutions
  • Solutions for Brands
  • Solutions for 3PLs
  • Solutions for 4PLs
  • Solutions for B2B
Products
  • Extensiv 3PL Warehouse Manager
  • Extensiv Warehouse Manager
  • Extensiv Order Manager
  • Extensiv Integration Manager
  • Extensiv Network Manager
Products
  • Customer Success
  • Implementation
  • Consulting
Ecosystem
  • Fulfillment Marketplace
  • Integrations
  • Partners
  • Become a Partner
Resources
  • Resource Library
  • Blog
  • Market Insights
  • What is a 3PL?
  • What is a 4PL?
  • What is a WMS?
  • Why a Cloud-based WMS?
  • Glossary
Help
  • Help Center
  • API Documentation
  • Extensiv Univerisity
  • Community
  • System Status
  • Extensiv Logo
  • 100 N Pacific Coast Hwy, Suite 1100, El Segundo, CA 90245
  • |
  • Contact Us:
  • 83-EXTENSIV 888.375.2368 (main)
  • |
  • 310.844.7570 (local)
  • Copyright © 2023 Extensiv
  • |
  • All rights reserved.
  • Privacy Policy
  • |
  • Terms of Service
  • Follow Us:
Expand