Creating Listing SKUs in Bulk (via Spreadsheet)
A Listing SKU is an identifier used to associate your Master SKUs with the listings on the various marketplaces you sell on. The Master SKU lives in Extensiv Network Manager, while the Listing SKU is the exact value listed on the sales channel. Listing SKUs are necessary to communicate order information and inventory updates.
NOTE
The Listing SKU spreadsheet cannot be imported for integrated sales channels until the sales channels are linked to your Extensiv Network Manager account, active or not.
In Extensiv Network Manager, you must create a Master SKU before you can create a Listing SKU for it. There is no limit to how many Listing SKUs you can create for a single Master SKU. The Master SKU and the Listing SKU can be the same. Listing SKUs must be unique per listing if there are multiple listings for a product on the same channel, but listings for different channels can have the same Listing SKU (this generally is a good practice). Listing SKUs should match exactly between Extensiv Network Manager and the sales channel, including capitalization. Mismatches will result in a failure to update inventory to the channel.
Marketplaces may refer to Listing SKUs differently on their platforms. Some examples include:
- Amazon – Seller SKU
- BigCommerce – Product Code/SKU
- eBay – Custom Label
- Magento – SKU
- Newegg – Seller Part #
- Shopify – SKU
- Walmart – SKU
By importing a spreadsheet, you are able to import Listing SKUs for multiple products at once. Listing SKU imports can only be done one sales channel at a time. However, this method allows you to upload many Listing SKUs for your products and edit existing Listing SKUs for that specific sales channel in one action.
Creating Listing SKUs via Spreadsheet
- Navigate to the Order Routing page and open the Products module.Click the Import/Export dropdown menu and select Import Listing SKUs.

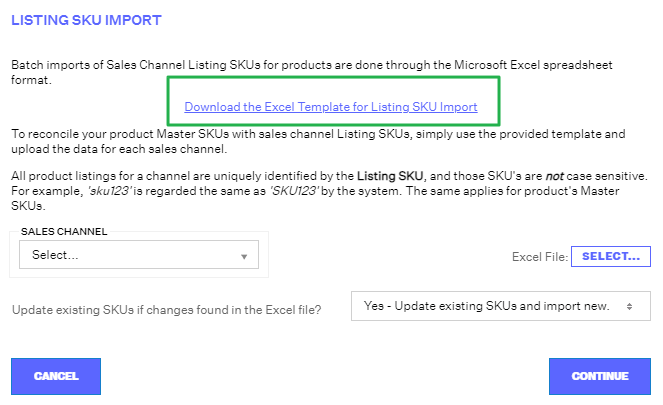
- The next window that appears will allow you to download the required Excel template to import the Listing SKUs. Download the template by clicking the underlined link outlined below.
NOTE
DO NOT edit the formatting of the download including adding/removing columns or deleting sheets. These actions can cause general errors upon import that will prevent any SKUs from being created. Changing the file name is fine, however.

NOTE
Each sales channel, including your manual channels, if any, requires its own Listing SKUs. You will not be able to place orders for products via manual orders if the manual channel does not have a Listing SKU set up prior. Additionally, any orders from sales channel integrations that do not have Listing SKUs set up will land in Unresolved order status and will require manual adjustment prior to being able to ship them.

-
Columns A through D are required to have input. Leaving Columns C or D blank will result in a failure to import your file, so make sure to fill those in.
- Master SKU: Enter the Master SKU for the core product, bundle, or kit you want to create a Listing SKU for.
- Listing SKU: Enter the Listing SKU for the corresponding Master SKU in the same row. If a single Master SKU has multiple Listing SKUs on the channel you are importing for, please make a new row for each, repeating the Master SKU value. Remember - Listing SKUs are case-sensitive for channels like Shopify.
- Push Inventory to Channel: TRUE will activate inventory pushes for the Listing SKU; FALSE will deactivate it. FBA Listing SKUs should be listed as FALSE, while FBM Listing SKUs should be set as TRUE.
- ACTIVE: TRUE will create the Listing SKU as Active once imported; FALSE will create the Listing SKU as inactive. You can always activate or edit an inactive SKU.
- Fulfillment Latency Days: Also known as handling time - this is the number of business days between when you receive an order on a channel and when you ship it. Include an integer in this field. This is specifically needed for Amazon and Walmart Listing SKUs since both channels have default fulfillment periods for their orders. As a reminder, if this is left blank for Amazon or Walmart Listing SKUs, it will default to 1 or 2 days (depends on the channel). If you cannot meet their requirements, indicate here how long it would take to fulfill orders so the channels are notified and you avoid penalties. This is the only column that is not required as Extensiv Network Manager will leave this field blank in the UI if you leave it blank in your import.
- Once your spreadsheet is completed, save your edits. Then return to Extensiv Network Manager and the Listing SKU Import window and select the Sales Channel you are uploading Listing SKUs for.
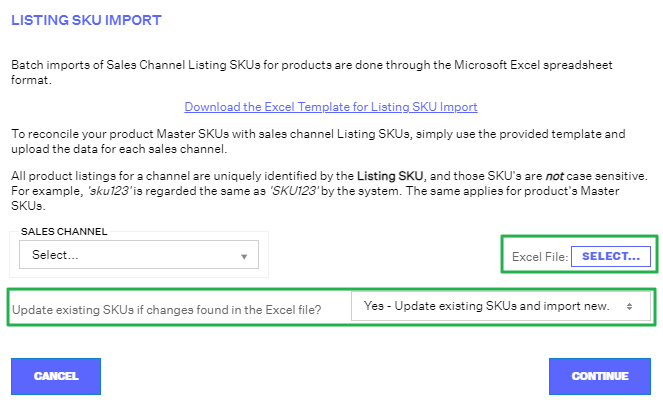
- Indicate the Excel File you are uploading by choosing the Select button. Then decide how Extensiv Network Manager should read the file by clicking the Update existing SKUs if changes found in the Excel file? dropdown menu.
- Choosing Yes will make any relevant updates to existing Listing SKU details as well as create any new Listing SKUs included. This is ideal if you are making edits to Listing SKU details for a product such as changing the current Active/Push/Latency values for existing Listing SKUs.
Note
This option does not indicate that the actual Listing SKUs will be updated. There is currently no way to do that in bulk in the UI. Reach out to Extensiv Network Manager Support for assistance there.
- Choosing No will only upload the new Listing SKUs and ignore changes made to any existing Listing SKUs. This is ideal if you are only adding new Listing SKUs with your import.

Once you indicate your choice, click Continue.
- Choosing Yes will make any relevant updates to existing Listing SKU details as well as create any new Listing SKUs included. This is ideal if you are making edits to Listing SKU details for a product such as changing the current Active/Push/Latency values for existing Listing SKUs.
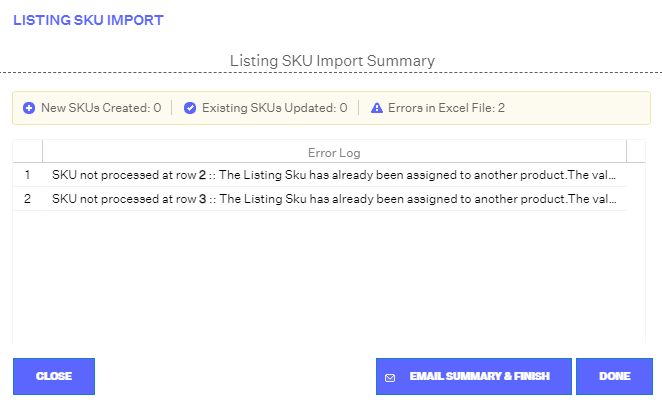
- Extensiv Network Manager will read the file and report how many new Listing SKUs were created, existing SKUs updated, and how many errors were processed in the Excel File. Errors in the file will be captured in the Error Log. A summary of the results can also be emailed so you can fully review which rows had which errors. At this point, any button you select will close the Summary window.
Note
If you get an error instead of an Import Summary window, there is an issue with your file other than simple input mistakes. This can happen if you: edited the formatting of the spreadsheet from the default, are missing required column inputs for Columns C and/or D, or deleted any sheets or columns from the file.

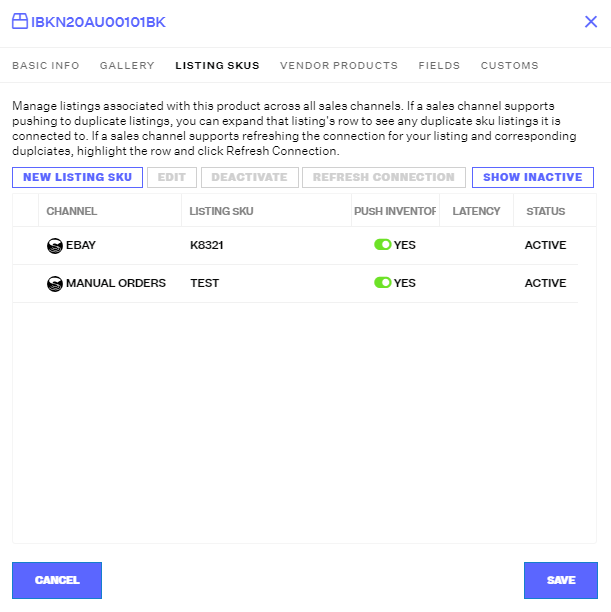
- If desired, you can search the Products Module for a Listing SKU you created or updated to ensure your inputs were applied as anticipated.

