 3PL Warehouse Manager

Updated on September 11th, 2025
-
3PL Warehouse Manager
- Receiving Operations
-
Inventory Management
- Item Creation
-
Inventory Management
- Using the Manage Inventory Page
- Understanding Allocation Logic
- Making Adjustments
- Transferring Inventory
- Editing Track-By Values
- Getting Started with Directed Putaway
- Understanding Directed Putaway Logic
- Understanding Replenishments
- Counting Inventory
- Performing Inventory Audits
- Batching Item Audits
- Automating Cycle Counts in 3PL Warehouse Manager
- Inventory Audit Best Practices and FAQs
- Movable Units
- Item Control
-
Shipping Operations
- Order Creation
- Order Management
-
Shipping Setups
- Understanding the Parcel API
- Connecting Carriers to Providers
- Understanding Carrier Account Logic
- Configuring Zebra Browser Print
- Configuring Small Parcel Settings
- Using Address Validation
- Connecting Multiple Accounts for the Same Carrier
- Managing Carrier Accounts
- Configuring Fulfillment Invoicing
- Using a Flat File Carrier Integration
- Managing Shipping Carriers
- Configuring a Drop Ship Address
- Managing Ship-to Contacts
- Managing Retailers
- Importing Ship-to Contacts
- Managing Ship Method Mappings
- Managing 3rd-Party-Billing Contacts
- Shipping Hazardous Materials
- Connecting an Existing EasyPost Account
- Creating a New EasyPost Account
-
Small Parcel Carriers
- Shipping in Small Parcel Suite
- Shipping with Amazon Buy
- Shipping with Amazon Shipping
- Shipping with APC
- Shipping with Asendia
- Shipping with Australia Post
- Shipping with Canada Post
- Shipping with Canpar
- Shipping with DHL eCommerce
- Shipping with DHL Express (AU)
- Shipping with DHL Express (US)
- Shipping with ePost Global
- Shipping with FedEx
- Shipping with FedEx One Rate®
- Shipping with FirstMile
- Shipping with FirstMile Direct
- Shipping With Flexport
- Shipping with Globegistics
- Shipping with GLS
- Shipping with GLS Canada
- Shipping with Landmark
- Shipping with LSO
- Shipping with OnTrac
- Shipping with PARCLL
- Shipping with Passport
- Shipping with Purolator
- Shipping with SEKO Ecommerce
- Shipping with Sendle
- Shipping with Stallion Express
- Shipping with Tusk Logistics
- Shipping with UniUni USA
- Connecting Small Parcel to UPS
- Shipping with UPS
- Shipping with USPS (BUKU Ship)
- Shipping with USPS (Endicia)
- Shipping with USPS (Stamps.com)
- Shipping with UPS Mail Innovations®
- Shipping with USPS (Pitney Bowes Expedited)
- Packing Basics
-
Order Processing
- Navigating the Small Parcel Homepage
- Packing in the Small Parcel Space
- Shipping in the Small Parcel Space
- Using High Volume Processing (HVP) with SmartParcel
- Printing Return Labels
- Printing Combo Labels
- Voiding Shipping Labels
- Troubleshooting Blank Shipping Labels
- Creating End of Day Requests (Manifesting)
- Reloading the Small Parcel Documents Menu
- Billing Best Practices for Shipping
- International Shipping
- System Configuration
-
Scanning Operations
-
Configuration
- Setting Up Barcodes
- Getting Started with GS1 Barcodes
- Connecting Printers to SmartScan
- Managing Barcode Definitions
- Updating Samsung Keyboards
- Configuring SmartScan on Zebra Enterprise Browser
- Clearing Enterprise Browser Cache in SmartScan
- Creating Custom MU Labels
- Configuring SmartScan on Keyence Devices
- Capturing Images in SmartScan
- Reprinting MU Labels in SmartScan
- Inbound Operations
- Inventory Management
- Outbound Operations
-
Configuration
- Integrations Content
- Best Practice Resources
- Release Notes
- Popular Articles
- Troubleshooting Guides
Enabling Integrated Packing Slip
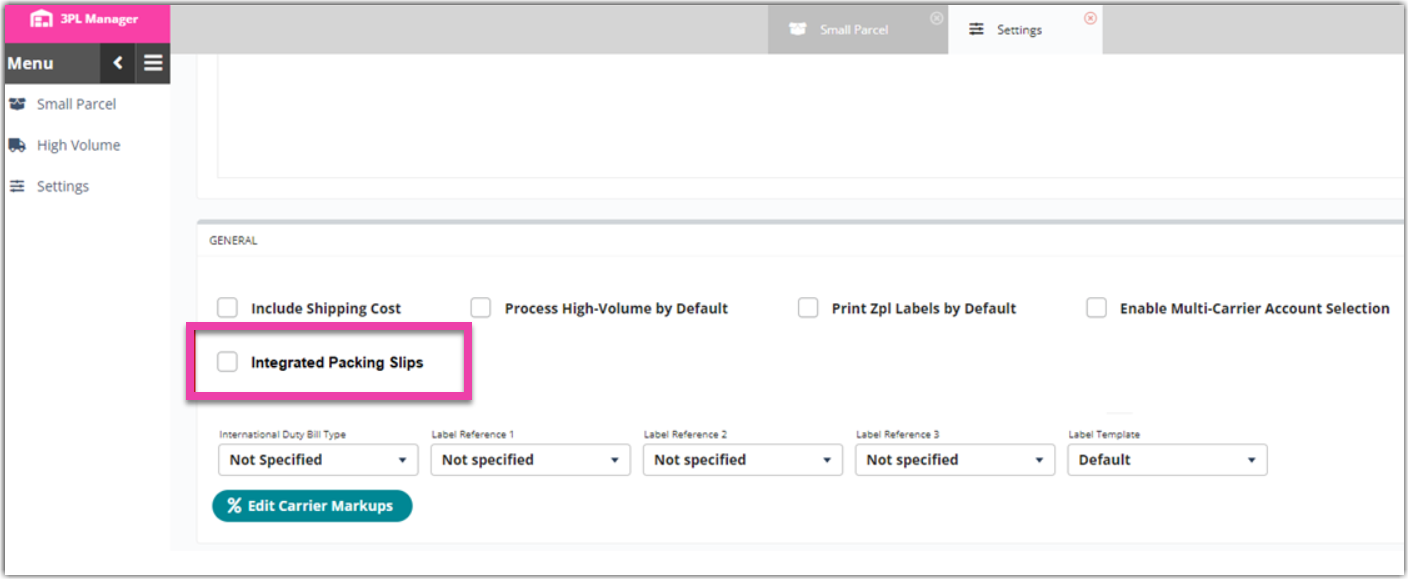
The Integrated Packing Slip enables the customers to specify a packing slip template to be automatically generated as a PDF when printing labels for an order allowing you to print shipping labels and packing slips at the same time. To set up a packing slip template, go to the Creating Packing Slip Templates article.
Please note that this feature is only available for single orders.
- Navigate to Small Parcel Suite.
- Click the Settings at the left navigation pane.

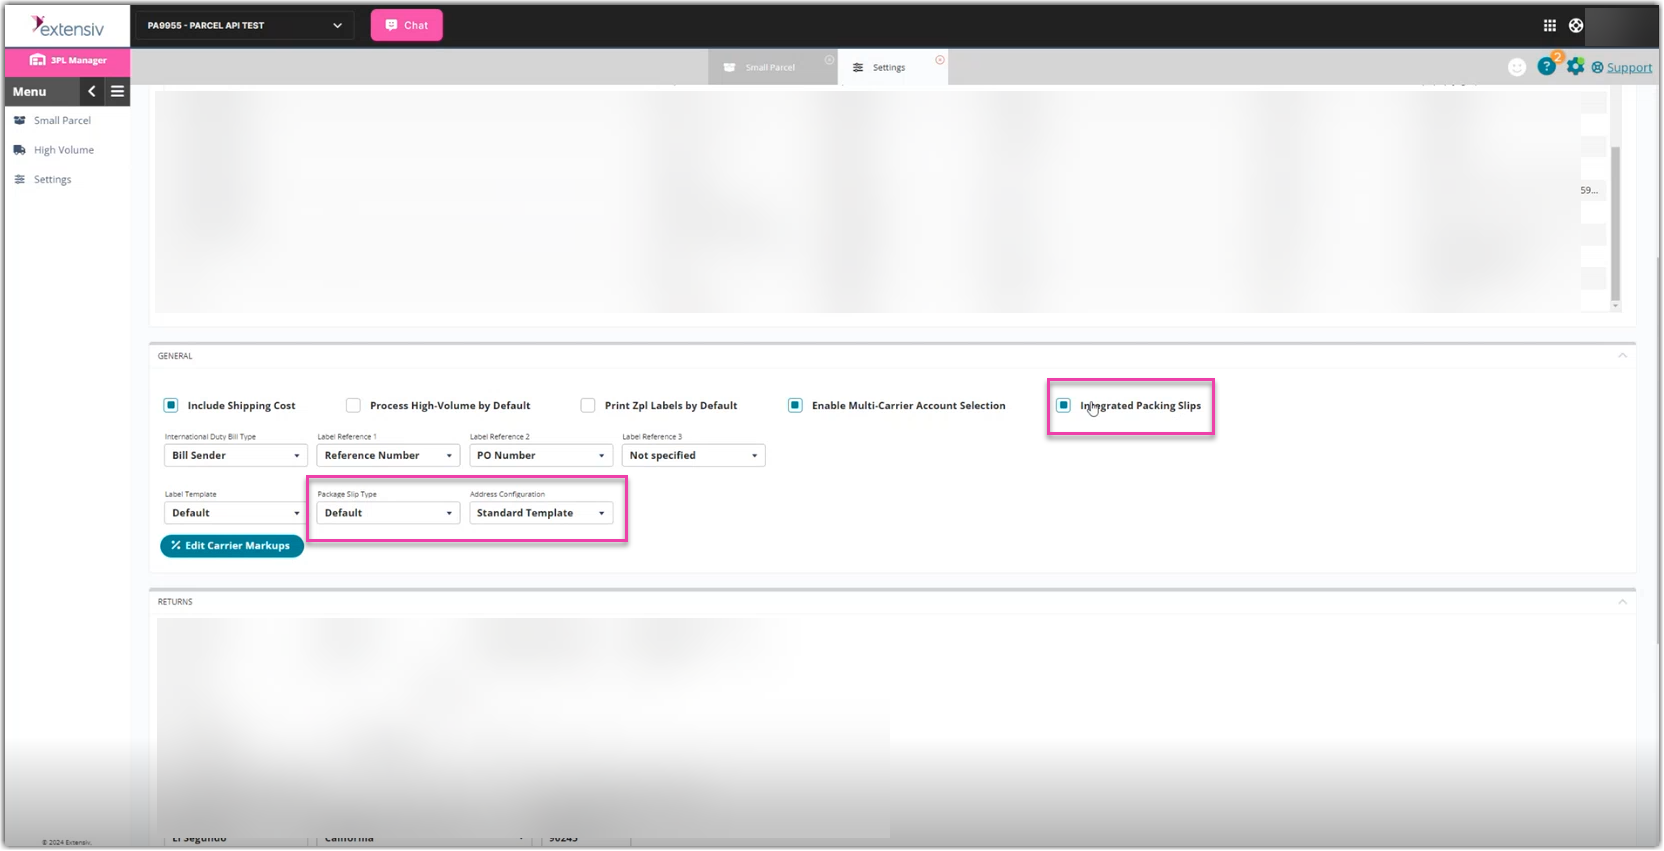
- Click the Integrated Packing Slips button.
After clicking the Integrated Packing Slips, the Package Slip Type and Address Configuration dropdown menus will be available.
- Select the desired Package Slip Type
- Select the desired Address Configuration

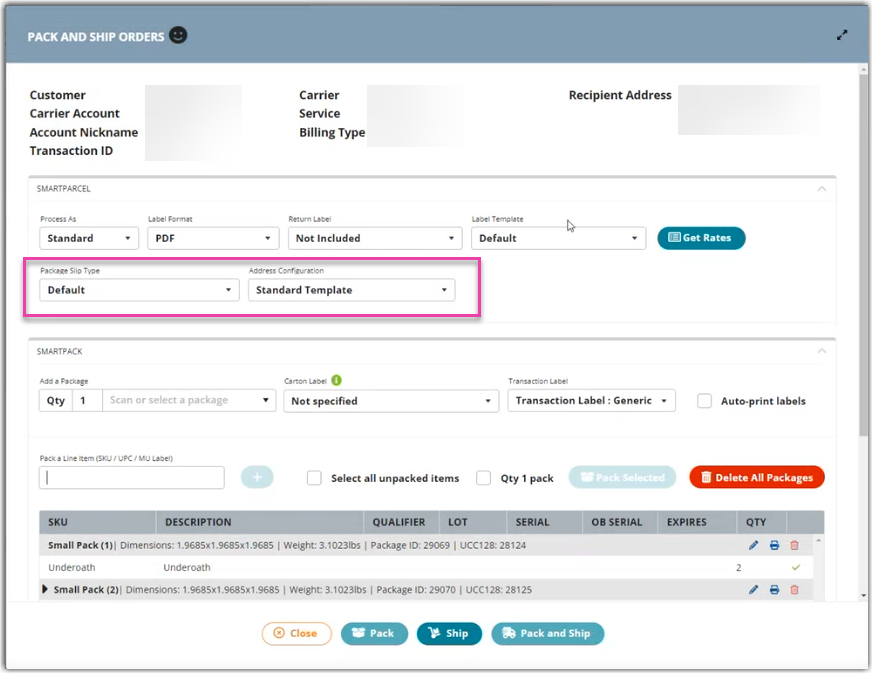
After enabling Integrated Packing Slips, the Packing Slip Type and Address Configuration dropdown menus will be available on the Pack and Ship Orders window (SmartPack section). Packing slips will now be generated with shipping labels and can be printed together.